How to Fix Stringing on Your 3D Printer: Causes and Settings Guide
Prints look great with PLA, but the moment you switch to PETG or TPU, cobweb-like strings show up everywhere. This guide breaks down why stringing happens — molten filament oozing during travel moves — and walks you through a step-by-step tuning order designed for home FDM/FFF users.
The first time I printed PETG, the result was a cobweb disaster. After bumping retraction from 1.0 mm to 1.6 mm and stepping the nozzle temperature down from 240 C to 235 C in 5-degree increments, the improvement was dramatic (your mileage will vary depending on your setup and filament). Rather than tweaking settings at random, working through retraction distance, speed, temperature, drying, travel paths, and finally Wipe/Coasting in that order tends to produce results much faster.
This article aligns the relevant setting names across Cura 5.x, PrusaSlicer, and OrcaSlicer while covering PLA, PETG, and TPU differences as well as the direct-drive vs. Bowden distinction. If you already know what the settings are called but can't seem to dial them in, this is for you.
What Is Stringing on a 3D Printer?
Types of Stringing and How to Tell Them Apart
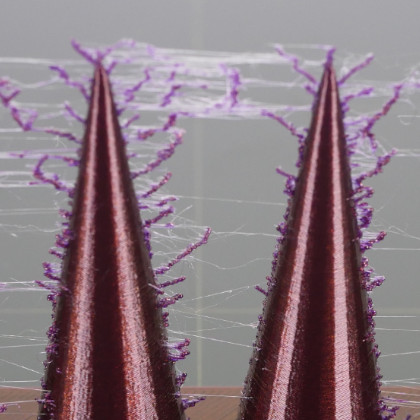
Stringing is what happens when thin threads of molten filament trail behind the nozzle during non-printing travel moves. It's one of the most common FDM defects — not only does it ruin surface finish, but it also adds cleanup time afterward. In my experience, heavy stringing easily doubles the post-processing effort with nippers and a heat gun. Even light fuzz that barely shows at first glance becomes obvious under direct lighting, and it makes sanding or priming noticeably harder.
It helps to sort symptoms into three categories. The first is light fuzz — wispy hairs around perimeters and corners that seem minor until you shine a light on them. The second is inter-object strings, the classic cobweb look where threads bridge between separate pillars or features. The third is stringing with blobs, where small globs of material form at the base of each string, indicating a more advanced issue than stringing alone.
A few similar-looking defects can cause confusion. Oozing is material slowly leaking out while the nozzle is idle, which differs from strings that form along a travel path. Overheating shows up as droopy corners and soft edges rather than airborne threads. Layer lines are periodic ridges from the layering process itself and have nothing to do with filament being dragged during moves. Prusa's documentation on stringing vs. oozing treats these as related but distinct problems, and that distinction matters for diagnosis.
糸引きと垂れ | Prusa Knowledge Base
糸引きやにじみは、「ヘアリープリント」とも呼ばれ、プリントしたモデルに小さな糸状のフィラメントが残ることを指します。これは通常、エクストルーダーが別のオブジェクトに移動している間に、フィラメントがノズルから流れ続けたときに起こります。これは
help.prusa3d.comWhy Filament Stretches During Travel Moves
The mechanism is straightforward: when the nozzle starts moving with molten plastic still at the tip, that plastic gets pulled into a thin string. Three factors drive this — melt viscosity that's too low, residual pressure inside the hotend, and insufficient retraction. A nozzle temperature that's too high makes the plastic runny and easy to stretch. High residual pressure means extrusion effectively continues even after the command stops. Combine that with weak retraction, and stringing ramps up fast.
A few terms are worth defining upfront to keep things clear. Retraction pulls filament back from the nozzle to relieve internal pressure. Wipe moves the nozzle tip in a short sweeping motion after extrusion stops, cleaning the tip. Coasting cuts filament feed slightly before the end of a line, letting residual pressure finish the last bit. Combing (in Cura) optimizes travel paths to stay inside already-printed areas rather than crossing outer walls.
Material differences follow directly from this mechanism. PLA is relatively forgiving, while PETG runs at higher temperatures and stretches more easily — it's widely recognized as a stringier material. SK Honpo's reference puts PLA nozzle temperatures at 190-220 C and PETG at 220-250 C, and that temperature gap maps directly to stringing tendency. Filament that has absorbed moisture adds another layer of trouble: wet material produces unstable extrusion, which makes strings and fuzz worse.
Auxiliary settings help, but they're corrective by nature. Wipe and Coasting deal with residual pressure and tip leftovers effectively. Community-sourced starting points often cited include Wipe distance of 0.4 mm, Coasting Volume around 0.064 mm3, and Minimum Volume Before Coasting around 0.8 mm3 — but these are community-derived ballpark figures, not necessarily the official defaults in Cura or any other slicer. They depend on your slicer version and profile. Get retraction dialed in first, then experiment with these in small steps. Pushing retraction too far in the other direction risks clogs and feed issues.
Impact on Appearance and Post-Processing
Stringing isn't just a cosmetic annoyance. A few stray threads might seem harmless, but they catch shadows and become very visible in person — especially with translucent PETG or dark-colored filaments. Fine details like hair tips on figurines, narrow slots on mechanical models, and lattice structures are where stringing damage shows the most, dragging down the overall finish quality.
Post-processing also gets heavier. Light fuzz can't always be trimmed cleanly with nippers alone — often you need a heat gun to shrink the threads. Even then, you may be left with minor surface roughness or drag marks. For parts destined for painting, the extra sanding and filling before primer adds up quickly. It's not unusual for finishing time to exceed print time. Personally, I feel this gap strongly: when stringing is minimal, a print comes off the bed nearly ready to go.
Blob-type stringing is worse still. Small globs at the base of each string create localized gloss changes and resist paint adhesion. On functional parts, blobs can become interference points in assemblies, and for parts with tight fits, surface irregularities become a problem before dimensional accuracy even enters the picture. What looks like a minor visual defect actually cascades into finish quality, labor time, and part functionality.
Diagnostic Checkpoints Before Changing Settings
Extruder Type Matters: Direct Drive vs. Bowden
Before touching any slicer settings, establish what kind of extruder you're working with. Direct-drive setups have the extruder mounted close to the hotend with a short filament path, so retraction response is quick and shorter distances work well. Bowden setups route filament through a PTFE tube, which introduces lag and flex — generally requiring longer retraction distances. Starting from this distinction makes every subsequent number easier to reason about.
The critical thing to understand is that longer isn't always better. I learned this the hard way on a Bowden-style Ender 3, where I kept pushing retraction past 5 mm trying to kill stringing. The stringing did decrease, but clogs and feed failures started showing up instead. Trading one problem for another defeats the purpose. That experience drove home the importance of starting from values appropriate for the extruder type and tuning from there.
Even when the symptoms look identical, the root cause weight shifts between the two types. On a direct-drive machine with severe stringing, temperature, moisture, or nozzle condition are often more likely culprits than retraction distance alone. On a Bowden machine, residual pressure that doesn't bleed off during travel is common, and insufficient retraction distance tends to show up directly in the symptom. Knowing which type you have gives you a reference point that keeps you from chasing the wrong variable.
Material Differences: PLA, PETG, and TPU
Stringing getting worse the instant you switch from PLA to PETG or TPU isn't your imagination — it's a fundamental difference in material behavior. PLA is comparatively mild on stringing and responds well to basic retraction and temperature adjustments. Its typical nozzle range of 190-220 C keeps things manageable, and tuning feedback is usually predictable.
PETG is a step up in difficulty. The higher temperature range means the melt stretches more readily, and stringing is noticeably more common. In my own setup, carrying PLA settings over to PETG consistently produced thin strings bridging between pillars. With PETG, rather than trying to muscle through with retraction alone, you'll get further faster by addressing temperature, moisture, and nozzle cleanliness together. Minor contamination or storage issues that PLA tolerates tend to show up immediately with PETG.
TPU changes the game entirely. Because it's soft and flexible, the feed path has an outsized influence on behavior. More retraction can help in some cases, but overdoing it destabilizes extrusion — excessive retraction on TPU often makes things worse. With a direct-drive setup, very short or even zero retraction sometimes produces the most stable results. Approaching TPU with a PLA mindset and cranking up the numbers is a recipe for frustration.
At the diagnostic stage, knowing the material's baseline tendency is more useful than memorizing specific values. PLA strings lightly, PETG strings readily, and TPU is highly sensitive to conditions. That mental model alone saves you from over-interrogating your slicer settings.
| Factor | PLA | PETG | TPU |
|---|---|---|---|
| Stringing tendency | Relatively low | Prone to stringing | Prone, and highly condition-dependent |
| Temperature range | 190-220 C | 220-250 C | Not published |
| Retraction approach | Straightforward to tune | Address temp and moisture simultaneously | Excessive retraction often backfires |
Moisture, Nozzle Contamination, and Layout
After extruder type and material, turn your attention to filament storage condition and the physical state of the nozzle tip. Moisture-laden filament tends to produce bubbly, unstable extrusion that increases stringing and fuzz. Leaving an open spool sitting out during humid weather or storing filament unprotected for extended periods can mean that no amount of slicer tuning fully eliminates the problem. Prusa's guide on drying filament makes clear that moisture-related print defects are well-documented. At this stage, the important thing is simply not ruling out "the material is wet" as a possibility.
Nozzle contamination is another easily overlooked factor. A small buildup of carbonized resin or scorched material on the tip acts as a catch point, pulling strings on every travel move. This is especially common after printing PETG at elevated temperatures or after switching between materials. Even a tiny dark spot can degrade how cleanly the melt breaks away. When settings are dialed in but results remain stubborn, physical nozzle contamination is worth investigating.
Part layout and travel distance significantly affect how visible stringing becomes. Printing many small parts spread across the bed or test geometries with widely spaced pillars increases the number of long travel moves, making strings far more obvious. Conversely, a single dense model may hide the issue simply because travel distances are short. This isn't an improvement in settings — it's just geometry. The classic case: a Benchy looks clean, but a multi-part batch on the same plate turns into a cobweb.
Before diving into slicer adjustments, run through this checklist:
- Is the printer direct drive or Bowden?
- Is the material PLA, PETG, or TPU?
- Has the filament been sitting open for a while?
- Is the nozzle tip free of scorched buildup?
- Does the layout involve many parts or long travel moves?
Ruling out physical and material factors first makes the subsequent retraction and temperature tuning far more readable. It's tempting to jump straight into the slicer, but these five checks often reveal half the cause on their own.
フィラメントの除湿 | Prusa Knowledge Base
FFF 3Dプリントで使用される材料の多くは吸湿性があります。これは、周囲の環境から水分子を容易に引き寄せることを意味します。プリントに使用する際、湿気を吸収した材料は期待通りに動作しない場合があります。 予防策 フィラメントによって吸湿性
help.prusa3d.comStep-by-Step Guide to Fixing Stringing
Stringing usually has multiple overlapping causes, so isolating one variable at a time converges faster than scattershot changes. Rather than jumping to Wipe or Coasting first, I lock in my comparison conditions and then work through retraction, speed, temperature, drying, and travel path in that order. Sometimes a 5-degree temperature drop is all it takes for strings to snap cleanly — and that kind of breakthrough is easy to spot when you follow this sequence.
Step 1: Pick a Test Model
First things first: choose one test model and stick with it. Retraction or stringing test models with frequent travel moves between pillars work well. A standard tower-style print from Thingiverse or Printables will do — what matters is printing the same model under the same conditions every time.
If you switch models between tests, you can't tell whether the improvement came from the setting change or the geometry change. Going from a two-pillar test to a Benchy to a multi-part layout across three tests makes it impossible to attribute any improvement. At minimum, keep the model, layer height, filament, nozzle, cooling, and placement constant.
I don't try to solve everything in one test print. Instead, I pick a model that shows stringing clearly and treat it as my benchmark. If you're taking comparison photos, start shooting from the same angle at this stage — it makes the progression much easier to see.
Step 2: Retraction Distance and Speed
With your test conditions locked in, start adjusting retraction distance in small increments. For direct drive, begin at 1.0 mm and adjust in 0.2-0.5 mm steps. For Bowden, start at 4.0 mm and move in 0.5 mm steps. As discussed earlier, pushing past 5.0 mm generally introduces more problems than it solves.
The key is to avoid large jumps. On a direct-drive machine starting at 1.0 mm, try 1.2 mm, then 1.4 mm. On Bowden, go from 4.0 mm to 4.5 mm, then 5.0 mm. This lets you see where improvement plateaus.
Pair distance with retraction speed. Start around 35 mm/s and adjust by 5-10 mm/s in either direction. If strings persist, try bumping speed up slightly. If retraction seems to destabilize things, back off. Soft materials like TPU are particularly sensitive to high retraction speeds — the filament can buckle in the feed path, so working toward slower speeds tends to give better results.
At this stage, avoid changing distance and speed simultaneously by large amounts. Dial in distance first, then fine-tune speed. This way, you can clearly attribute each improvement.
Step 3: Print Speed and Travel Speed
Once retraction is roughly dialed in, try lowering print speed. Typical printing speeds sit around 50-70 mm/s. For stringing, step down to 50 mm/s, then try 45 mm/s and compare. Slower extrusion gives the nozzle less residual material to trail during moves.
Travel speed, on the other hand, isn't always the lever you'd expect. Faster travel means less time for strings to form in the air, but it doesn't always translate to cleaner breaks. If retraction and temperature aren't right, cranking up travel speed alone rarely helps much. I've had multiple experiences where adjusting travel speed barely moved the needle, but dropping print speed one tier made an immediate difference.
This is especially true for PETG, where slowing down and letting extrusion stabilize often works better than trying to outrun the problem. With TPU, the benefit of lower speeds is even more pronounced.
Step 4: Lower Nozzle Temperature in 5-Degree Steps
After speed, bring the nozzle temperature down in 5 C increments. For PLA, start from around 210 C and work within the 190-220 C range. For PETG, start from around 240 C within the 220-250 C range. So if you're printing PLA at 210 C, try 205 C, then 200 C. For PETG at 240 C, try 235 C, then 230 C.
Stringing is fundamentally about plastic being soft enough to stretch, so even a small temperature drop can change how cleanly the melt separates. In cases where retraction distance alone didn't quite solve it, a 5-degree reduction sometimes makes strings noticeably thinner and snappier. Following the tuning order makes these moments hard to miss.
Be careful not to go too far, though. Dropping temperature too low causes under-extrusion, weak layer adhesion, and thin lines. If you see extrusion gaps, missing corners, or inconsistent flow, step back one increment. Chasing minimal stringing by lowering temperature indefinitely just trades one defect for another.
Step 5: Dry Your Filament
If stringing persists after working through the settings in order, introduce a drying step. Moisture in the filament has a bigger effect on stringing than most people expect. PETG and TPU are particularly susceptible — it's not unusual for settings alone to be unable to compensate for wet filament. After drying, reprint the same test model with the same settings. You may find the result changes even though you haven't touched a single parameter.
This retest matters. If you change settings at the same time as drying, you can't tell which one helped. When I suspect moisture, I dry the filament and reprint first. Only if strings remain do I go back to tuning settings. This saves the detour of endlessly questioning slicer parameters.
Prusa's guide on drying filament is explicit about moisture causing print quality issues. Drying comparisons are especially revealing when stringing presents as fuzzy, hair-like threads rather than clean strings.
Step 6: Travel Path Optimization and Wipe/Coasting
Once the major stringing is gone, fine-tune with travel path settings and auxiliary features. The order here is travel path optimization first, then Wipe, and Coasting only if needed. Layering auxiliary features on top of poorly tuned retraction makes it hard to tell if you're solving the problem or just masking it.
In Cura 5.x, searching for Retraction, Wipe, Coasting, and Combing in the settings search bar gets you to the relevant options quickly. Combing Mode optimizes travel paths to stay within already-printed areas and reduce outer wall crossings, though the default behavior (such as whether 'All' is the default mode) may vary depending on your Cura version and profile. Check the actual defaults in your slicer. Start Wipe and Coasting from small community-derived values and evaluate both their effect and side effects.
💡 Tip
Rather than enabling everything at once, turn on Combing and perimeter-avoidance first, retest, then add Wipe, and only then Coasting if needed. This keeps before-and-after comparisons clean.
By this stage, your test prints should show a visible reduction in stringing. Documenting the tuning order as a flowchart makes it reusable the next time you switch materials.
How to Think About Recommended Settings
Starting Points by Extruder Type
When establishing starting values, the first thing to consider isn't the material — it's the extruder mechanism. Direct-drive systems have short filament paths and respond well to shorter retraction distances. Bowden systems need to account for tube lag and flex, so longer starting distances are appropriate. Getting this backwards throws off your entire tuning baseline.
As a guideline, direct drive starts well in the 0.5-2.0 mm range, while Bowden starts in the 3.0-5.0 mm range. Bowden users often feel the urge to push higher, but staying below 5 mm is generally safer. Even if stringing improves, going past that threshold invites clogs, feed failures, and filament grinding. I've found repeatedly that keeping a Bowden setup at 4 mm and dropping temperature by 5-10 C gives better overall print stability than pushing retraction to the max.
For retraction speed, 30-45 mm/s is a reasonable starting zone. Stiffer materials like PLA and PETG tolerate the higher end, while flexible TPU benefits from starting lower within that same range. Signs that speed is too aggressive include gear-skipping sounds, visible grinding marks on the filament surface, and momentary feed instability. If those appear, reduce speed before increasing distance.
Here's a summary of starting points:
| Extruder Type | Retraction Distance Start | Distance Tuning Range | Retraction Speed Start | Speed Tuning Range | Nozzle Temp Start | Temp Tuning Range | Print Speed Start | Speed Tuning Range |
|---|---|---|---|---|---|---|---|---|
| Bowden | 3.0-5.0 mm | Cap at ~5 mm | 30-45 mm/s | Adjust in small increments | High end of manufacturer range | Step down in 5 C increments | 50-70 mm/s | Move toward 50 mm/s |
This table isn't a "set and forget" prescription — think of it as a map that keeps your starting point in the right neighborhood. Stringing isn't determined by distance alone, so beginning with mechanism-appropriate values and then working through speed and temperature in order makes it far easier to identify what's actually helping.
Temperature and Speed Starting Points
For temperature, starting from the high end of the manufacturer's range and stepping down in 5 C increments is easier to manage than starting cold. PLA's general range is 190-220 C, PETG's is 220-250 C. Work within these bounds, using your current temperature as the starting point and moving lower. Too high and the melt stretches too easily; too low and you get under-extrusion or weak layers. Staying inside the recommended range is the baseline rule.
Print speed works well starting around 50-70 mm/s. When stringing is persistent, shifting toward 50 mm/s often shows clear improvement. For appearance-critical prints, going down to 40-50 mm/s reduces the amount of excess material sitting at the nozzle tip. The key, again, is avoiding wild swings — step through values you can compare meaningfully.
Temperature and speed look like separate settings, but they interact heavily. Running PETG at high temperature while only increasing speed doesn't change the fact that the melt stretches easily. Conversely, settling speed to around 50 mm/s and then dropping temperature by 5 C can produce a sharp, visible change in string thickness and break behavior. I've found that stabilizing speed first and then adjusting temperature reduces the chance of misreading what's actually working.
Slicer naming differences are also worth noting at this stage. Cura uses Combing Mode, Coasting, and Outer Wall Wipe Distance. PrusaSlicer's equivalents are Avoid crossing perimeters and Wipe while retracting. OrcaSlicer has similar features under slightly different names. Keeping both the English UI names and their functional equivalents in mind helps when switching between slicers.
Why Wipe and Coasting Come Last
Wipe and Coasting genuinely help, but their role is fine-tuning, not primary treatment. If retraction distance, speed, temperature, and print speed haven't been sorted out first, enabling these makes it impossible to tell whether you've solved the root cause or just hidden it. Starting with auxiliary features also hurts reproducibility when you switch materials.
In Cura, reasonable starting points are Wipe 0.4 mm, Coasting Volume 0.064 mm3, and Minimum Volume Before Coasting 0.8 mm3. Adjust from there in roughly 25-50% increments. A Coasting Volume of 0.064 mm3 looks tiny on paper, but it can be surprisingly effective at bleeding residual pressure at line endpoints. Push it too far, though, and line endings start thinning or developing small gaps — stop where you first see positive results.
Wipe isn't a silver bullet either. The short sweeping motion along the outer wall can change how the seam looks. It's useful when refining appearance, but on top of poorly tuned extrusion conditions, it can trade stringing for a different surface defect. This is exactly why it belongs at the end — layered on top of conditions that are already close.
💡 Tip
Think of Wipe and Coasting as settings where the question isn't "does it help?" but "how much can I add before side effects appear?" Add a little, observe improvement, and if pushing further starts thinning outer wall endings, the sweet spot is one step back.
PrusaSlicer leans more on Wipe while retracting and Avoid crossing perimeters than a standalone Coasting toggle. Cura's Combing/Coasting, PrusaSlicer's perimeter avoidance/wipe, and OrcaSlicer's equivalents all target the same goal: reducing strings during travel and cleaning up line endpoints. With the fundamentals already dialed in, these auxiliary settings converge quickly.
Material-Specific Strategies: PLA, PETG, and TPU
PLA: Priority Order
PLA is the most predictable of the three to tune, and the standard stringing workflow applies naturally. The priority order is retraction first, then temperature, and a light check on moisture if needed. With a typical nozzle range of 190-220 C, PLA offers plenty of room to pull temperature lower without running into trouble.
Starting points are fairly clear. For direct drive, retraction of 1.0-1.5 mm at around 35 mm/s is a solid beginning. For Bowden, 4.0-4.5 mm works well. When strings persist after a small distance increase, move to temperature. Stepping down 5 C at a time from your current value often thins out strings and helps them snap cleanly during travel.
PLA isn't immune to moisture, even though it's less dramatic than PETG. If a relatively fresh spool with correct settings starts showing more fuzz than expected, storage condition is worth a quick check. Rather than leading with heavy drying measures, tune temperature and retraction first, then use moisture as an explanation for anything that remains.
Travel path optimization is also effective with PLA. Enabling Combing Mode in Cura or Avoid crossing perimeters in PrusaSlicer reduces the number of times the nozzle crosses open air, which directly cuts down on bridging strings. Once the basic conditions are right, this single setting can noticeably improve surface quality on PLA. Reaching for auxiliary settings before optimizing travel paths tends to be less effective and more prone to side effects.
PETG: Temperature, Drying, and Nozzle Cleanliness
PETG is a definitively stringy material, and forcing PLA settings onto it usually doesn't work. The priorities to address first are temperature, drying, and nozzle tip cleanliness — retraction comes after, starting from moderate values. The general nozzle range for PETG is 220-250 C, but for stringing, biasing toward the lower end of the recommended range is the standard approach. If strings are heavy at 240 C, try 235 C, then 230 C — the change in stretch behavior is usually quite pronounced.
What catches many people off guard with PETG is nozzle tip contamination. A small blob of material clinging to the tip gets dragged along during travel moves and becomes a stringing source in itself. When slicer adjustments aren't moving the needle, I check the nozzle tip. PETG can make it look like your settings are off when the actual problem is physical contamination. This check is just as important as temperature tuning.
Drying also has an outsized effect. Wet PETG doesn't just string more — it can produce a fine, fuzzy texture across the entire surface. In my experience, hitting it with a heat gun cosmetically smooths things temporarily, but the real fix was drying the filament and revisiting temperature. Appearance can be patched, but if extrusion itself is unstable, the problem comes back.
For retraction, PETG benefits from a lighter touch. On direct drive, 0.6-1.2 mm at 30-35 mm/s is a reasonable starting zone — moderate and slightly slow. The instinct to "just pull more" is strong with PETG, but in practice the remaining stringing is usually driven by temperature, moisture, or tip contamination rather than insufficient retraction. Increasing distance without addressing those factors just makes the troubleshooting path murkier.
Summing up PETG in three bullet points: strings easily, highly sensitive to moisture, and nozzle contamination amplifies symptoms. Any recommended starting-point table should use ranges rather than fixed values to reflect real-world variability.
TPU: Consider Weak or Zero Retraction
TPU doesn't just string easily — the entire tuning philosophy shifts compared to PLA and PETG. The most important point is that excessive retraction frequently makes things worse. The soft, stretchy filament can buckle or bind inside the feed path when pulled back aggressively, leading to even more erratic extrusion.
This means the TPU approach flips the retraction mindset: instead of dialing it up, start from disabled or very weak settings. A practical testing sequence for direct drive is 0 mm (off), then 0.4 mm, then 0.8 mm, with speeds in the 15-25 mm/s range tested cautiously. TPU behavior varies significantly with Shore hardness, feed path design, and slicer quirks, so treat these as one set of community-derived reference points — not prescriptions. Always confirm your own stable range through incremental A/B testing.
I've had days where disabling retraction entirely on TPU produced the most stable output. Settings that worked perfectly for PLA and PETG can backfire directly on TPU, which really drives home just how different this material is. Softer TPU grades in particular benefit from prioritizing continuous extrusion flow over aggressive pullback — paradoxically, this often reduces stringing too.
That said, TPU isn't a "set it weak and forget it" material either. Some configurations genuinely need a bit more retraction distance. Incremental testing is the answer: compare 0 mm, 0.4 mm, and 0.8 mm in small steps to find where instability begins. TPU tuning takes patience — even running a few test towers eats noticeable time — but finding the boundary of your stable zone is worth the investment.
For a visual reference, a comparison table with direct-drive starting ranges by material makes the TPU difference immediately clear: PLA at 1.0-1.5 mm, PETG at 0.6-1.2 mm, TPU at 0-0.8 mm. The dramatically lower TPU range communicates at a glance that this material requires a different approach. Add the general guideline of biasing temperature toward the lower end of the recommended range for each material, and the priority framework falls into place.
When Nothing Seems to Work: Advanced Checklist
Ruling Out Hardware Issues
If stringing persists after thorough settings tuning, the cause has likely shifted from software to the physical condition of the nozzle and extrusion system. Two things to inspect first: residual material inside the nozzle and tip wear. Carbonized plastic or leftover material from a previous filament inside the nozzle causes subtle extrusion inconsistencies that show up as persistent fine strings. A worn nozzle tip with a deformed orifice breaks the melt less cleanly, producing the same symptom. When PLA suddenly strings more after a long PETG campaign, swapping the nozzle entirely can fix the issue faster than any slicer adjustment. I've had printers where no amount of setting refinement helped — and a fresh nozzle changed the behavior immediately.
Feed path friction also matters. On Bowden machines, look for scratches or contamination inside the PTFE tube. On direct-drive machines, check for snag points in the guide path. Even small sources of resistance reduce effective retraction distance regardless of what the slicer commands. Excessive tube bending, high spool-holder resistance, or a rough inlet guide can all manifest as stringing. TPU, being soft, is especially sensitive to any feed path imperfection — physical path smoothness matters more than numerical settings.
Extruder feed issues are another hardware-side culprit. Worn drive gears, insufficient tension on the filament, or over-tightened tension that deforms the filament surface all reduce retraction effectiveness. If stringing gets worse after you increase retraction, the problem might not be the distance — it might be that the feed mechanism can't reliably execute that distance. Gear wear dust, grinding marks on filament, and slip sounds during retraction are all diagnostic clues that the slicer can't reveal.
Old or inconsistent filament can also be treated as a hardware-adjacent factor. Even within the same material type, a different lot can behave differently in terms of melt viscosity and stringing. I sometimes swap to a known-good spare spool as a quick A/B test before spending more time on settings. Aged spools or filament with inconsistent diameter and winding quality become noise sources that make settings tuning unreliable.
Multi-tool machines deserve a separate mention. The Prusa XL, for example, defaults to 70 C idle temperature for inactive tools. Depending on the material and workflow, that standby warmth can cause slight oozing from the inactive nozzle, which then turns into strings after a tool change. If stringing appears only during multi-tool prints but not in single-tool mode, check the idle nozzle's condition and temperature rather than assuming it's a retraction issue.
Re-Checking Drying and Storage
Drying can feel like a box you've already checked, but the actual drying may have been insufficient. This applies not just to old filament — even relatively fresh spools stored carelessly pick up enough moisture to become the primary stringing cause. PETG and TPU are especially prone to this, and the symptom can be subtle: no popping or surface bubbles, just persistent fine strings during travel moves. If temperature and retraction are properly tuned but improvement has stalled, filament moisture deserves another look.
Dryer display temperatures shouldn't be taken at face value either. In my own setup, the dryer box read 50 C while an external thermometer showed the filament was sitting at low 40s. Adjusting placement and settings to hit the actual target temperature made a noticeable difference in post-dry print quality. Inaccurate dryer temperatures are a common reason behind "I dried it but nothing changed" frustrations — you end up questioning settings and materials when the real issue is that the drying didn't reach operating temperature.
Storage habits are worth revisiting too. If dried filament goes straight back into ambient room conditions — or gets exposed to air for extended periods during spool changes — the drying benefit erodes quickly. Filament that has been wet once shows especially clear before-and-after differences, making print comparisons useful for confirming the cause. Reprinting the same G-code before and after drying often reveals the root issue more clearly than any settings change.
If you're looking for visual proof, side-by-side comparison photos of the same test model printed before and after drying — or a close-up of a contaminated nozzle tip — are highly effective. The difference between "slightly damp" and "significantly moisture-laden" is hard to convey in text alone, but visible fuzz and tip buildup make the case immediately intuitive: this isn't a settings problem.
Reconsidering Part Layout
Layout affects stringing more than many users realize. Multi-object simultaneous printing in particular increases the number of open-air travel moves, turning subtle stringing that's invisible on a single part into an obvious cobweb across the plate. If one copy prints clean but four copies on the same plate turn into a mess, it's not a settings regression — it's the increased travel frequency. In these cases, rather than pushing retraction harder to compensate, try switching to sequential printing (one at a time) first and comparing the results. That tells you whether layout was the real variable.
This effect is especially strong with PETG and TPU. Materials that don't break cleanly during travel turn every long move between objects into a visible string. I always check multi-part travel paths before committing to a production batch, because single-part test results don't predict batch behavior reliably. Sequential printing may shift total print time slightly, but it makes quality assessment far more straightforward.
Layouts with widely separated starting and ending points for travel also work against you. Models with thin pillars spaced far apart, or small objects scattered across the build plate, give residual nozzle material long distances to stretch. Conversely, grouping parts closer together shortens string length and lightens post-processing. Stringing is a function of not just settings but how the nozzle is asked to move — and different layouts with identical settings can produce very different results.
Multi-tool machines add another dimension. Tool changes that leave the standby nozzle slightly oozing compound the layout problem: every tool switch adds a potential stringing event on top of normal travel. If stringing shows up exclusively during multi-tool prints, reducing the number of parts to lower travel frequency often calms the behavior significantly. What looks like a layout issue may actually be idle temperature bleed interacting with frequent tool switches.
Summary: Default Procedure When You're Unsure
The Fastest Path to Results
When in doubt, print the same test model and change one variable at a time. The default order is retraction distance, then speed, temperature, drying, travel path, and finally Wipe/Coasting. I keep a simple spreadsheet with four columns — distance, speed, temperature, drying status — and log each test. Even that minimal tracking dramatically reduces guesswork and improves reproducibility.
The "Don't Overdo It" List
The urge to push settings hard is strongest when stringing won't quit, but restraint pays off. Retraction distance doesn't improve linearly — as a rule of thumb, avoid pushing past 5 mm. Temperature shouldn't be forced below the manufacturer's recommended range either, as that trades stringing for different defects.
Auxiliary settings also have a right time to appear. Wipe and Coasting have their place, but they're finishing touches, not first-line fixes. Reaching for them early while stringing is still heavy just obscures the real cause. Dial in drying and travel paths first, then add Wipe/Coasting sparingly if needed.
Material Priority Summary
The first move depends on the material. For PLA, start with retraction, then temperature, and a light moisture check if needed — that's usually enough. For PETG, address temperature, drying, and nozzle cleanliness first, then fine-tune retraction. For TPU, lock in low speeds first, keep retraction weak, and consider disabling it entirely if the result is more stable.
Across the entire article, the default procedure is: fix your comparison conditions, print at least once, log the change, move to drying and travel optimization if improvement stalls, and save auxiliary settings for last. Sketching this as a simple flowchart before you start keeps the process from drifting.
Related Articles
Support Settings and Removal for FDM: How to Get Clean Results
FDM supports are a balancing act -- too many and removal becomes a nightmare, too few and your print collapses. This guide walks through the full workflow: deciding where supports are actually needed, configuring them for easy removal, taking them off safely, and cleaning up the marks they leave behind.
3D Printer Calibration | First Layer, E Steps, Flow, and Dimensional Accuracy
A 3D printer builds objects layer by layer from digital data, but on FDM machines, print quality breaks down most often when first layer height, extrusion steps, and dimensional baselines drift out of alignment rather than from flashy slicer tweaks.
3D Printer Troubleshooting: Causes and Fixes by Symptom
A practical guide for FDM/FFF 3D printer owners dealing with stringing, first-layer adhesion failure, and mid-print under-extrusion. Learn how to isolate the cause from the symptom, where to look first, and how to adjust settings step by step.
How to Fix 3D Printer Warping | A Cause-by-Cause Approach
I once printed a box in ABS near a window during winter, and all four corners lifted 1-2mm before the print failed entirely. Then I threw together a simple cardboard enclosure, and the warping practically vanished from that run onward. It taught me that warping is not just about the material -- if you isolate causes in the right order, it is a very controllable problem.