Filament Not Extruding: Fastest Fixes by Symptom
When your FDM 3D printer stops extruding, tearing things apart right away rarely helps. A faster path is sorting the problem into one of five symptom patterns, then working through targeted checks for each. This guide is for anyone dealing with no extrusion at print start, stops mid-print, the motor spinning without output, manual push working but auto-feed failing, or the extruder going completely silent -- and wanting a clear order of operations from pre-disassembly checks through cold pulls, PTFE and nozzle inspection, and E-steps verification.
On my own machine, a long overnight print once ended up as nothing but air by morning. Narrowing things down methodically, the fix turned out to be a cold pull plus replacing the hotend cooling fan. Another time, switching to TPU caused immediate feed failures -- dialing back retraction and straightening the filament path was all it took. The most reliable approach starts with five checks you can do without taking anything apart: confirming a proper load, clearing path resistance, verifying temperature, checking the Z gap, and inspecting the nozzle tip. Only move to deeper interventions when those come back clean.
Beyond that, this guide covers drying conditions and temperature adjustment ranges for PLA, PETG, TPU, and nylon, the specific settings worth touching in Cura 5.x and OrcaSlicer 2.x, and test methods that minimize wasted prints. Most extrusion failures boil down to either a feed problem or a clog, and once you have a clear sequence to follow, even beginners can self-recover a surprisingly high percentage of the time.
Start by Identifying Your Symptom
Before disassembling anything, pin down which symptom you are seeing, then work through checks in this order: test extrusion, Z gap, filament path, temperature, drying, cooling. Reversing this sequence leads to wasted effort -- you might pull the nozzle when the bed was simply too close, or spend hours suspecting the drive gear when moisture was the real culprit. With hot nozzles, heat blocks, and moving axes in the picture, the safest first step is simply identifying when extrusion fails. That alone narrows the field considerably.
As a single-sentence guide for each symptom: if nothing comes out at print start, look at the first-layer Z gap; if it stops mid-print, check temperature readings and hotend cooling; if the motor turns but nothing extrudes, examine gear grinding residue and path resistance; if manual push works but auto-feed does not, investigate drive tension and path alignment; if nothing moves at all, troubleshoot the extruder motor wiring and electronics.
The table below maps each symptom to its most likely cause and where to look first.
| Symptom | Definition | Primary Suspect | First Check |
|---|---|---|---|
| Nothing at print start | No material deposited from the very first layer | Bed too close, light nozzle clog, incomplete load | Z gap, tip ooze, manual test extrusion |
| Stops mid-print | Extrudes for minutes to hours, then fails | Under-temperature, cooling failure, moisture, debris | Temperature readout, hotend cooling fan, filament condition |
| Motor turns, nothing extrudes | Drive motor audibly running but no material output | Feed failure, gear slipping, nozzle clog, PTFE gap | Gear grinding dust, manual push test, tube path |
| Manual push works, auto does not | Material flows when pushed by hand but not under motor drive | Feed failure, insufficient tension, path resistance, flexible filament buckling | Extruder tension, path bends, gear engagement |
| Complete silence | No extruder motor movement at all | Electrical issue, motor failure, wiring or driver fault | Motor response to load command, cables, connectors |
A side-by-side comparison including initial response steps:
| Item | Nothing at start | Stops mid-print | Motor turns, no output | Manual push only | Complete silence |
|---|---|---|---|---|---|
| Primary cause | Bed too close, tip clog, incomplete load | Under-temperature, moisture, debris, cooling failure | Gear dust, slipping, path resistance, severe clog | Insufficient drive pressure, path bends, flexible filament buckling | Electrical, motor, wiring |
| First check | Z offset, leveling, manual extrusion | Temperature, fan, filament surface, sound changes | Gear cleaning, PTFE path, manual push test | Gear pressure, path constraints, gear wear | Load response, connectors, wiring |
| Initial response | Extrude to tip, increase bed distance | Adjust temperature, dry filament, inspect cooling | Clean gears, straighten path, cold pull | Adjust tension, fix path, review retraction | Check wiring, isolate motor |
| Next step | Cold pull if light clog persists | Inspect for heat creep, clear clog | Check PTFE-nozzle junction | Verify feed rate, E-steps check if needed | Full electrical diagnosis including mainboard |
Visualized as a decision flow, the entry points look like this:
Figure 1: Symptom > First Try > Next Step

Nothing at print start
  > Test extrusion in mid-air
  > Extrudes: Check Z gap
  > Does not extrude: Cold pull or inspect tip clog

Stops mid-print
  > Check temperature display and cooling fan
  > Normal: Check drying and debris
  > No improvement: Inspect for heat creep / internal clog

Motor turns, nothing extrudes
  > Check for grinding dust on gears
  > Dust present: Clean gears, adjust tension
  > No dust: Inspect PTFE path and nozzle clog

Manual push works, auto does not
  > Check extruder tension and path resistance
  > Flexible filament: Reinforce path constraints
  > No improvement: Check feed rate and gear wear

Complete silence
  > Attempt load command, observe motor response
  > No response: Inspect wiring / motor / driver
  > Responds: Isolate firmware or command-side issue
Nothing at Print Start
The very first thing to check here is whether the nozzle is so close to the bed that it is physically blocking the exit. If only the first layer fails, the skirt or brim refuses to stick, or you hear the nozzle scraping the surface, a Z gap issue is far more likely than a clog. FLASHFORGE's own troubleshooting guide for "filament does not come out when printing starts" lists insufficient nozzle-to-bed distance as a primary cause.
With FDM, filament can be fully molten inside the nozzle and still have nowhere to go if the gap below is too tight. It looks identical to a clog, but the actual problem is just bed distance. This happens especially after auto-leveling when the Z offset has been pushed too low, or after a nozzle swap when first-layer settings were tightened.
The diagnostic here is straightforward: preheat, then test-extrude in mid-air. If material drops out -- even as a thin thread -- the nozzle interior is not fully blocked, and the issue points toward Z gap rather than internal obstruction. If mid-air extrusion is also poor, suspect an incomplete load or light tip clog. Unloading, trimming the tip clean, and reloading often clears it. For a stubborn light clog, unloading at 10-15 degrees C above normal print temperature can help the material release.
Stops Mid-Print
For this symptom, the temperature reading at the moment it stopped and the state of the hotend cooling fan matter most. When the first several minutes or even hours go fine but extrusion then thins out, sputters, or cuts off entirely, something is changing over time -- not a simple load failure.
The usual suspects are under-temperature, filament moisture, dust or debris, over-extrusion, and cooling degradation. On my own printer, extrusion would look perfectly normal for the first 10-30 minutes, then suddenly quit. Cleaning clogs never stopped it from recurring. Tracing the problem back, the root cause was heat creep -- the hotend cooling fan had weakened, letting PLA soften too far up and plug the entrance zone. That kind of gradual failure feels completely different from a straightforward start-up clog.
Heat creep happens when filament softens prematurely above the melt zone, causing a sudden spike in push resistance. It becomes more likely as hotend cooling deteriorates. Technical analyses confirm that rising heat-sink temperatures directly contribute to clogs. A fan that spins does not necessarily cool enough -- reduced airflow from dust buildup or bearing wear can undermine cooling without an obvious failure.
Moisture deserves its own mention. PLA is relatively forgiving, but prolonged exposure introduces stringing, bubbling, rough surfaces, and unstable extrusion. PETG, TPU, and nylon are even more sensitive. Prusa's filament drying guide documents these tendencies. Target drying conditions: PLA at 40-45 degrees C for 4-6 hours, PETG at 65 degrees C for 4-6 hours, TPU at 40-50 degrees C for 4-6 hours, nylon at 70-80 degrees C for 12-24 hours.
Motor Turns but Nothing Extrudes
First priority here: check whether grinding dust has accumulated around the extruder gears. If you hear the motor working -- clicking, skipping -- but nothing moves forward, the gears are very likely chewing into the filament and spinning without grip.
Once the gear teeth pack with shavings, bite force drops dramatically. The motor does its job; it just cannot push material anymore. Prusa's guide on "filament not loading" lists gear debris and misalignment among the most common loading failures. Pull the filament out, then look closely at the gear teeth for white powder or resin fragments. Cleaning this alone fixes the problem more often than you might expect.
The next diagnostic step is a manual push test with the nozzle at temperature. If hand pressure pushes material through but the motor cannot, the nozzle is not fully blocked -- the problem is insufficient drive force or excessive path resistance. If even hand pressure barely moves anything, internal clogging becomes the stronger suspect.
On Bowden setups, an under-seated PTFE tube is another classic. Even a tiny gap between the tube end and the nozzle collects molten resin that hardens into a persistent resistance point with every heat cycle. Ender-series and E3D V6-compatible hotends are particularly sensitive to this -- if the tube was not properly seated while hot, gap-related clogs follow.
Manual Push Works but Auto-Feed Fails
When hand pressure produces clean extrusion but the motor cannot keep up, the nozzle is not fully blocked and melting is happening fine. The bottleneck is that auto-feed force cannot overcome the resistance in the system.
Common causes: insufficient extruder tension, worn drive gears, sharp bends in the filament path, and flexible filament buckling. TPU is especially prone -- any small gap in the path lets the filament bulge and jam before it reaches the gears. From personal experience, straightening the path and reducing retraction consistently resolved this with TPU. With flexible materials, minimizing unnecessary retractions often matters more than tweaking feed volume.
The temptation to jump straight to E-steps calibration is understandable, but for sudden failures, it is a lower-priority fix. E-steps correct chronic under- or over-extrusion well, but sudden feed loss almost always traces back to a mechanical cause. If feed volume verification is needed, the benchmark is a 100 mm extrusion test. Mark the filament, command 100 mm, measure actual output. If 95 mm comes out instead of 100, the E value needs roughly a 5.26% increase. But clean the gears and clear path resistance before running this test -- otherwise the measurement itself is unreliable.
💡 Tip
When manual push works but auto-feed does not, check "are the gears actually gripping?" and "is the filament kinked anywhere in the path?" before changing any settings. These two checks alone often get things running again quickly.
Complete Silence
If the extruder motor produces absolutely no movement, the first question is whether the command is reaching the motor at all. A load command or manual extrusion request that gets zero response points to an electrical issue, not a clog. This symptom belongs in a different troubleshooting branch entirely.
Inspect the motor connector, look for disconnected or damaged cables, test the motor itself, and check the stepper driver. Since the extruder uses the same type of stepper motor as the X and Y axes, other axes working fine while the E axis stays silent makes it easy to isolate. If wiggling the cable causes intermittent motion, a loose connection is likely. Consistent silence even with cable manipulation points toward the motor or driver.
No amount of nozzle cleaning or filament drying helps here. Simply distinguishing "motor turns but nothing comes out" from "motor does not turn at all" changes the entire repair strategy. Getting that initial branch right is the fastest path to resolution.
Five Pre-Disassembly Checks
Proper Loading and Test Extrusion
The single most effective first step before any disassembly is confirming that material has actually reached the nozzle tip. It can look loaded from the outside while actually stalling at the extruder entrance or slipping before the hotend. Skipping this check makes it easy to confuse Z gap problems with light clogs.
Heat the nozzle to 10-15 degrees C above the material's normal print temperature -- this helps push past light resistance. Then manually extrude 5-10 mm and watch for continuous output. Even thin or thread-like output confirms that at least the filament path is not completely empty. No output at all leaves path resistance or tip clogging on the table for later steps.
Running this check before pressing "print" pays off. A surprising number of "nothing at print start" cases turn out to be simply "material never reached the tip." FLASHFORGE's guide on the topic lists nozzle-bed distance alongside preheat state and pre-print extrusion verification as key starting-point checks.
On my own machine, PLA that had been sitting for a while loaded fine by feel but kept snapping partway through, preventing continuous feed. The spool had a light tangle, and the filament had absorbed enough moisture to become brittle. What looked like a loading problem was actually "the supply keeps breaking."
印刷を開始してもフィラメントが出てこない
印刷を開始してもフィラメントが出てこない場合、どうすればいいのか この問題は、3Dプリンターを買ったばかりの人にとってよくあることですが、解決もとても簡単です。もしエクストルーダーがフィラメントを押し出さず、印刷を開始
after-support.flashforge.jpClearing Spool and PTFE Path Resistance
If test extrusion feels heavy, the next step is checking for unnecessary resistance along the filament's travel. Is the spool binding? Is the holder creating friction? Are there tangles? Is the PTFE tube bent sharply or a fitting loose? Keep the path as short and gently curved as possible -- that alone adds stability. The difference between a well-routed and poorly-routed path is visually obvious and makes a clear impact.
Verifying Nozzle Temperature
Even with loading and path checks passing, wrong temperature alone can make extrusion unreliable. The important thing is not picking a single magic number. PLA varies by brand, color, and additive content; PETG and TPU show even wider variation. Always start with the recommended temperature range on the spool or manufacturer datasheet.
The pattern is consistent: too low and the filament does not melt fully, producing thin lines, breaks, and clicking sounds. Too high and you get tip drool, discoloration, and stringing. Mid-print stops can also trace back to under-temperature, but even at the pre-print check stage, simply adjusting temperature sometimes resolves everything.
When returning to a material after a break, old settings may still be loaded with the wrong temperature. Running PLA at near-PETG temperatures encourages excessive tip drool before printing even begins, while running PETG at PLA-range temperatures produces sluggish extrusion with odd resistance. Temperature affects not just "extrudes or not" but also tip condition and first-layer stability downstream.
First-Layer Z Gap and Leveling
If test extrusion works fine in mid-air but fails the moment the nozzle approaches the bed, suspect the first-layer Z gap. When the nozzle sits too close, there is no room for resin to escape, and the result looks like "nothing is coming out." In reality, pressure builds inside the hotend -- this is a completely different problem from a load failure or full clog.
A basic check with paper or feeler gauges works well here. Confirming proper clearance with a slight drag feel across the bed already eliminates a lot of guesswork. Extremely flattened first layers, strained extrusion sounds, and lines that suddenly thin out are classic signs of a Z offset set too low.
A visual reference for good versus bad Z gap would be the most helpful illustration here. Proper gap produces lines that are gently squished and connected; too-close gap blocks the exit entirely; too-far gap leaves round threads that do not adhere. Personally, I have started nozzle-cleaning sessions more than once only to discover that the Z offset had simply drifted too low. Testing mid-air extrusion first exists precisely to avoid that misdiagnosis.
💡 Tip
If material extrudes cleanly in mid-air but not on the bed, the Z gap is a stronger suspect than anything inside the nozzle. A pre-print test extrusion makes this distinction immediately.
Clearing Tip Residue and Light Clogs
Even without a major internal clog, hardened resin on the nozzle tip alone can disrupt extrusion at print start. Material that oozes during preheat cools and solidifies at the tip, and that blob interferes with fresh material flow. Dragging on the first line, intermittent breaks in the opening seconds, or a brief gap before extrusion begins often trace back to tip condition.
The fix is simple. Remove the solidified residue from the tip and extrude a few centimeters of fresh material before starting the print to flush out any leftover burnt or half-cooled resin. This matters especially after printing PETG or other materials at higher temperatures, which tend to leave stubborn residue.
Hardened tip residue disrupting initial extrusion is common enough to deserve emphasis. When preheat ooze cools into a lump at the tip, it physically blocks fresh flow. Cleaning the tip and pushing a few centimeters of fresh material through before starting significantly improves first-layer consistency.
For the symptom-specific procedures that follow, the goal is to fix the issue in order of invasiveness so you avoid unnecessary disassembly. Useful tools to have ready: hex wrenches, a brush, nozzle wrench, tweezers, and flush cutters. The brush does not need to be metal -- a toothbrush works well for clearing grinding dust around extruder gears. More than once, what I assumed was a nozzle clog turned out to be nothing more than gear dust, cleared in seconds with a toothbrush.
Here is the symptom-to-procedure mapping before diving into details:
| Symptom | Suspected Cause | Procedure | Verification |
|---|---|---|---|
| First layer only | Leveling drift, Z offset too low | Re-level bed, readjust Z offset | Mid-air extrusion works; first-layer test lines not over-squished |
| Motor turns, no output | Gear dust, gear slipping, path blockage | Clean gears, remove dust, check path | Continuous output on manual test extrusion; clicking sound gone |
| Manual push works, auto does not | Path resistance, tension mismatch, feed volume drift | Review PTFE path, adjust tension, E-steps check only if needed | Stable auto-feed; 100 mm test within acceptable tolerance |
1) First Layer Only: Re-Leveling and Z Offset Adjustment
If mid-air test extrusion works but bed-level extrusion does not, the Z gap is the primary suspect. When only the first layer struggles but upper layers print normally, an overly tight Z offset is more likely than a partial clog. Adjust with small increments, verifying with a first-layer test pattern each time.
Step-by-step:
- Preheat the nozzle and test-extrude a small amount in mid-air to confirm material flows continuously. If it does, the nozzle interior is not fully blocked.
- Re-level the bed. Check all four corners and the center, looking for any spots where the gap is significantly tighter than the rest.
- Raise the Z offset slightly. Rather than making large jumps, alternate between small adjustments and first-layer test prints to zero in on the right distance.
- Print a small square or first-layer test pattern. Lines should be gently squished and connected -- not paper-thin (too close) or round and unattached (too far).
- Once the first layer looks right, run a short actual print to confirm the start-up gap has disappeared.
FLASHFORGE's troubleshooting guide for no extrusion at print start lists bed distance as a key cause. When only the opening moments are unstable, adjusting Z is often faster than cleaning the nozzle.
2) Motor Turns but Nothing Extrudes: Gear Cleaning
If the motor clicks and skips but filament does not advance, check the extruder gear area for grinding dust first. Packed debris in the gear teeth kills grip, causing the drive to spin without pushing material. A brush cleans this out, and the fix often stops there.
- Remove the filament and inspect the tip for deep gouges or thinned sections. Cut away any damaged portion with flush cutters so the tip is clean and straight.
- Open the extruder cover as far as your machine allows. Look at the gear teeth for white powder or resin fragments. With white or clear PLA, shine a light on the area -- the dust blends in easily.
- Brush the gear teeth and surrounding area clean. For caked-on debris, pick it out with tweezers and clear the valleys between teeth. A toothbrush is genuinely one of the best tools for this -- I keep one on the desk permanently.
- Reload filament and test-extrude in mid-air. Continuous output confirms the gear cleaning helped.
- Run a short test print and verify that the motor-running-but-nothing-coming-out pattern is gone. If grinding resumes mid-print, path resistance is still present downstream.
Prusa's "filament not loading" guide lists gear debris and bite issues as top causes. The fix looks unglamorous, but this single step resolves the problem far more often than expected.
フィラメントがロードされていかない | Prusa Knowledge Base
フィラメントがエクストルーダーにロードされていないにもかかわらず、プリンタがフィラメントを内部に引き込もうとしている場合があります。通常は単純なハードウェアの問題であり、この記事に従って修正してください。  準備のためのチ
help.prusa3d.com3) Manual Push Works but Auto Does Not: Path Resistance, Tension, and E-Steps
This symptom tells you the nozzle is not fully clogged and melting is working. The problem lives on the drive side -- either insufficient push force or too much resistance in the path. On Bowden machines, PTFE tube bends are the usual suspect; on direct-drive machines, entrance misalignment or tension problems dominate. TPU and other flexible filaments are especially vulnerable here.
- On Bowden machines, check for loose fittings or an under-seated tube. Standard 1.75 mm filament tubes typically have a 2.0-2.5 mm inner diameter and 4 mm outer diameter. A rough cut face or partially pulled-out tube end creates a resistance point.
- Review extruder tension. Too loose and the gear slips; too tight and it gouges the filament. Reload, test-extrude short bursts, and find the tension where clicking and slipping stop.
- If retraction is set aggressively, reduce it and retest. TPU in particular jams more readily with large retraction distances.
- Only if auto-feed remains weak after all the above, move to the 100 mm feed test. Command 100 mm of extrusion, measure actual output. If 95 mm comes through on a 100 mm command, the E value needs roughly a 5.26% increase.
- After any E-steps adjustment, repeat the 100 mm test and follow up with a test print to confirm stable extrusion.
💡 Tip
E-steps calibration is a valid correction, but it is not a one-shot fix for sudden feed failure. Clear path resistance and set tension first -- that makes it much easier to judge whether E-steps adjustment is actually needed.
M92 is the Marlin G-code for setting steps-per-unit, used to read and write E values. For this symptom, though, eliminate mechanical resistance before touching firmware values -- the results will be more stable.
4) Stops Mid-Print: Ruling Out Temperature, Moisture, Dust, and Cooling
When extrusion runs fine for minutes or hours and then stops, the problem is not an initial load failure but a condition that degrades over time. Work through temperature, filament condition, debris, and hotend cooling in that order. Mid-print stops often involve overlapping factors, so isolate them one at a time.
Step-by-step:
- Review nozzle temperature. Confirm it sits within the material's recommended range and is not running low. Under-temperature can allow a print to start but gradually lose extrusion consistency. Test-print and watch for thinning lines or clicking.
- Suspect moisture. Look for rough filament surface, popping sounds during extrusion, increased stringing. Drying targets: PLA at 40-45 degrees C for 4-6 hours, PETG at 65 degrees C for 4-6 hours, TPU at 40-50 degrees C for 4-6 hours, nylon at 70-80 degrees C for 12-24 hours. After drying, reprint the same model and check whether the mid-print stop recurs.
- Clean dust from the filament surface and extruder entrance. Small particles accumulate during long prints and add resistance. Run a longer test print after cleaning.
- Inspect the hotend cooling fan. Weak heat-sink cooling triggers heat creep -- filament softens too far up and plugs the path. The temperature differential between the heat block and heat sink can exceed 110 degrees C in simulation; if cooling cannot maintain that gap, problems follow.
- If the fan shows abnormal noise, wobble, or dust buildup, clean or replace it and retest. Verify the fix by printing past the point where the failure previously occurred -- a short test is not sufficient.
FLASHFORGE's guide on mid-print extrusion failure lists temperature, dust, and cooling degradation as the main culprits. On my own machine, overnight failures that I kept attributing to clogs were actually caused by a weakening hotend cooling fan. Replacing it ended the recurring issue entirely.
印刷途中でフィラメントが出てこなくなる
印刷途中でフィラメントが出てこなくなる場合、どうすればいいのか 最初の内はフィラメントが正しく押し出されていたが、印刷中に突然押し出しがされなくなった場合、原因として考えられる可能性があるものがいくつかあります。以下で
after-support.flashforge.jp5) Full Clog: Unload, Cold Pull, PTFE and Nozzle Inspection
When nothing extrudes at all, unloading is difficult, and even hand pressure cannot push material through, treat this as a full clog. Unlike lighter feed issues, forcing things here makes it worse. Follow the sequence: unload, cold pull, then inspect connection points.
Step-by-step:
- Raise temperature 10-15 degrees C above normal print temperature and attempt to unload. QIDI's nozzle clog guide treats this temperature boost as a standard first step. If the filament comes out, inspect the tip for bulging or charring.
- If unloading succeeds, proceed to a cold pull. A clean pull brings discolored or charred resin out with it, confirming internal contamination has been removed. Adjust temperature in 5-degree increments to find the sweet spot for a clean pull.
- After the cold pull, reload and test-extrude in mid-air. Continuous flow means the clog is likely cleared.
- If problems persist, inspect the PTFE tube tip. Deformation, heat damage, or a stepped edge creates a gap against the nozzle where resin accumulates and re-clogs. Trim the tip clean or replace the tube.
- If nozzle damage or internal blockage is suspected, remove the nozzle with a nozzle wrench, inspect, and replace if necessary. For E3D-style hotends, Prusa's nozzle guide emphasizes tightening while hot.
- After nozzle replacement, verify continuous mid-air extrusion, then run a small test print to confirm stable output from start through the mid-print window.
A note on nozzle diameter: the standard 0.4 mm is versatile but more susceptible to debris and char than 0.6 mm or 0.8 mm nozzles. Maximum layer height is roughly 80% of nozzle diameter, so 0.4 mm tops out around 0.32 mm. Pushing extrusion parameters too aggressively with a 0.4 mm nozzle can bring you right to the edge of a full clog.

3Dプリンターのノズル詰まりを直す方法:ステップバイステップガイド
このガイドは、コールドプル、手動クリーニング、および今後の詰まりを防ぐためのヒントを使用して、ノズル詰まりを診断して修復するのに役立ちます。
jp.qidi3d.comRecommended Settings and Adjustment Ranges
Temperature
Temperature controls not just whether material extrudes, but whether it extrudes consistently over time. The most practical approach is starting from the material's standard print temperature and adjusting in 5-degree increments. Too low and extrusion starts fine but gradually thins; too high and tip drool, stringing, and charred residue accumulate, becoming clog seeds during long prints.
For unloading and reloading, aim for 10-15 degrees C above the standard print temperature. With PLA printing around 200 degrees C (~392 degrees F), an unload temperature of 210-215 degrees C helps the material release cleanly. Letting temperature reduce resistance works better than pulling harder.
On my machine, PLA at 205 degrees C produced mildly unstable extrusion, but bumping to 210 degrees C immediately smoothed things out. These differences tend to emerge through 5-degree adjustments rather than large jumps.
Cold Pull Temperature Tuning
A cold pull works best when you treat it as finding the right pull temperature rather than targeting a fixed number. If the first attempt does not release, raise 5 degrees C and try again. Too hot, and the tip comes out soft and stringy without bringing internal debris with it.
At the right temperature, the pulled tip retains some impression of the nozzle interior, and discolored or charred residue comes out attached. Jumping to a high temperature makes the material too soft to "scrub" -- you end up just pulling filament through rather than cleaning. That is why the 5-degree approach matters. The difference between a clean pull and a wasted one often lives in a narrow window.
Drying Temperature and Duration by Material
When moisture contributes to extrusion problems, having specific numbers speeds up decision-making. Based on guidelines compiled in QIDI's filament drying guide, these four materials cover most practical situations:
| Material | Drying Temperature | Duration |
|---|---|---|
| PLA | 40-45 C (104-113 F) | 4-6 hours |
| PETG | 65 C (149 F) | 4-6 hours |
| TPU | 40-50 C (104-122 F) | 4-6 hours |
| Nylon | 70-80 C (158-176 F) | 12-24 hours |
PLA is the most forgiving, but spools left out for extended periods still develop thinning extrusion and stringing. PETG responds well to both temperature tuning and drying. TPU combines moisture sensitivity with path-resistance issues. Nylon shows the most dramatic difference from drying but requires significantly longer sessions -- short runs often are not enough.
Slicers like Cura 5.x and OrcaSlicer 2.x are strong options, though UI labels and menu structures change across versions and localizations. The focus here is on which parameters to adjust and practical examples from experience. For slicer-specific procedures, always cross-reference the official documentation or provide screenshot sources.
Putting some example adjustments side by side helps build intuition for the scale of changes involved.
The first candidates to adjust on the slicer side are initial layer flow rate, initial layer speed, and nozzle temperature. From experience, slightly increasing initial layer flow (around 105%) or slowing initial layer speed (roughly 30-40 mm/s range) tends to stabilize first-layer adhesion. These values vary by material, slicer, and machine, so treat them as starting points. Change one parameter at a time, record results, and reference the relevant slicer's official documentation when possible.
💡 Tip
Changing one variable at a time and test-printing between each makes it far easier to identify what actually helped. Adjusting temperature, initial layer flow, and initial layer speed simultaneously may produce improvement, but you will not know which change mattered -- making it hard to reproduce next time.

3Dプリント用フィラメントの乾燥方法
フィラメントを効果的に乾燥させることで、3Dプリントの仕上がりを向上させる方法を学びましょう。市販の乾燥機からDIYソリューションまで、湿気によるプリントの不具合を防ぐ方法を学びましょう。
jp.qidi3d.comE-Steps: The 100 mm Benchmark Test
E-steps calibration is useful when extrusion volume is consistently off. The benchmark is a 100 mm extrusion test. Mark the filament at the extruder entrance, command 100 mm of extrusion, and measure how much actually fed through. If the actual measurement falls short of 100 mm, multiply the current E value by 100 divided by the measured distance.
For example, if 95 mm comes out on a 100 mm command, the new E value is the current value multiplied by 100/95. On Marlin firmware, M92 sets the E value. The procedure is straightforward, but this is a touch-only-when-needed calibration. For sudden extrusion failures, clogs, gear slipping, and path resistance take priority as explained earlier. E-steps correct chronic "always a bit short" or "always a bit much" drift effectively, but they do not explain sudden failure.
Nozzle Diameter and Maximum Layer Height
The standard nozzle is 0.4 mm. It offers the best balance of detail and ease of use, with the widest range of documented settings. Maximum layer height is approximately 80% of nozzle diameter, putting the 0.4 mm nozzle's practical ceiling around 0.32 mm. The 0.28-0.32 mm range is the most commonly usable band; keeping this ceiling in mind prevents over-aggressive settings.
For clog resistance, 0.6 mm and 0.8 mm nozzles have a clear advantage. Even without abrasive filaments like wood-fill or carbon fiber blends, the 0.4 mm bore is more susceptible to small char particles and debris. When stable extrusion matters more than fine detail, stepping up to a larger nozzle diameter can be more effective than pushing temperature or cleaning frequency.
For long prints where I want to minimize feed resistance, increasing nozzle diameter feels more straightforward than cranking temperature -- and the results tend to be more consistent.
When Pre-Disassembly Checks Are Not Enough: Disassembly and Replacement
PTFE Tube and Nozzle Contact Surface
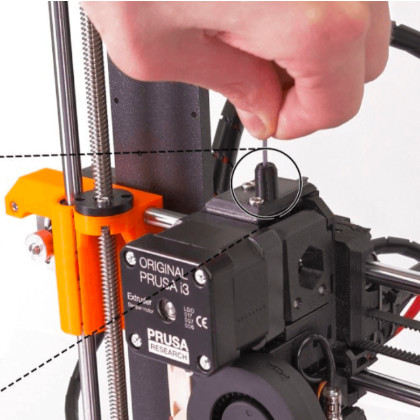
If the previous checks have not resolved things, the next priority -- even for beginners -- is the PTFE tube tip condition. On Bowden setups and hotends where the PTFE tube extends into the upper heat zone, whether the tube end sits flush against the nozzle makes a major difference in clog tendency. A healthy tube tip is straight, flat, and free of discoloration. If it has mushroomed outward, is crushed, or has turned brown, it is a replacement candidate. Heat-damaged PTFE deforms more than it appears to, creating a snag point for filament.
The particularly insidious failure is when even a tiny gap exists between the PTFE end and the nozzle. Molten resin seeps into that gap, hardens, and compounds into a severe clog. I once spent considerable time with cold pulls and temperature adjustments for what seemed like a mild extrusion deficiency, only to find on disassembly that the PTFE-nozzle contact had failed -- hardened resin had formed a plug in the gap. On the surface it was "slightly weak extrusion"; inside, the gap had collected a thick blob of solidified material. Treat any PTFE-to-nozzle gap as unacceptable.
When working at this level of disassembly, the standard safety precautions apply: power off before positioning your work, use heat-resistant gloves and proper tools for any step that requires the hotend to be heated. If the tube's cut face is angled or deformed from compression, reinstalling it will just reproduce the problem. A visual comparison of a good tube tip versus a bad one -- the kind of thing a "PTFE tip condition comparison" photo would capture -- makes the judgment much more intuitive.
Nozzle and Heat Break Assembly
If the PTFE tip looks fine but resin leaks or repeated clogs continue, the next suspect is the nozzle-to-heat-break junction. When this connection is not properly seated, the nozzle can appear tight from the outside while the internal metal-to-metal seal fails, giving molten resin a path to escape. That gap leads not only to clogs but to charred resin traces around the heat block -- dark staining or amber-colored deposits that signal a sealing failure, not just surface contamination.
E3D V6-style hotends in particular require hot-tightening -- torquing the nozzle at operating temperature. Tightening while cold, even firmly, leaves a residual gap that only appears once the metal expands at printing temperature. Prusa and E3D documentation include heated tightening as a standard nozzle-change step for exactly this reason. The key is following the machine-specific procedure rather than improvising, since different hotend designs sequence the heat break and nozzle differently.
This area is hard to diagnose visually, and beginners who push too deep risk stripping threads or damaging heater components. Always support the heat block with a proper wrench rather than twisting it unsupported, and follow the heating-before-tightening protocol for your specific hotend. The burn risk is high, and the fix depends more on correct assembly sequence than on force.
💡 Tip
If resin seeps from around the nozzle but you keep treating it as a tip clog, the internal junction failure goes undiagnosed. Look at whether resin is leaking above the nozzle opening, not just through it -- that distinction moves the diagnosis forward.
Hotend Cooling Fan Inspection
When printing starts normally but extrusion fails after a period of time, hotend cooling fan stall or airflow reduction becomes a key suspect. This is the fan cooling the heat sink -- not the part-cooling fan. When it stops doing its job, heat migrates upward and triggers heat creep. PLA is especially vulnerable because it softens at relatively low temperatures, and premature softening above the melt zone plugs the path.
Technically, the temperature differential between the heat block and heat sink is substantial, and cooling must maintain a sharp thermal boundary. When that boundary collapses, filament swells inside the heat break and becomes unpushable. On my own printer, an overnight print that ended in complete air-printing by morning traced back to a degrading hotend cooling fan. It still spun when nudged, but its sustained airflow had dropped below useful levels. This kind of failure is hard to distinguish from nozzle clogs, but the pattern of working at first, failing gradually, mainly with PLA, and briefly recovering after a restart is a strong indicator.
Checking whether the fan spins is not sufficient. Listen for bearing noise, watch for wobble, look for dust buildup, and assess whether the airflow actually reaches the heat sink with force. Small fans in the 40x40x10 mm range are common, and their modest size makes airflow loss easy to miss. Even with blades turning, dust on the fins or a loose wire connection can reduce cooling below the threshold needed to prevent softening at the entrance.
Nozzle Replacement and Diameter Selection
Nozzles are consumables. When cleaning and reassembly do not help, replacement is the next step. Even here, though, follow your machine's documented replacement procedure. Nozzle swaps look simple but involve hot components and precise tightening. Hotends that require hot-tightening (like E3D-style designs) will leak or re-clog if the nozzle is only tightened cold. Prepare burn prevention and have the right wrench to support the heat block.
For diameter, 0.4 mm is the baseline. It balances detail and usability, and the vast majority of documented settings assume it. For clog resistance, 0.6 mm and 0.8 mm are meaningfully better. The larger bore shrugs off small char particles, debris, and minor moisture effects that would cause issues at 0.4 mm. The trade-off is reduced reproduction of fine text and sharp edges. Maximum layer height also scales with diameter (roughly 80% of bore), so larger nozzles open up thicker layers and shorter print times.
From practical experience, stable extrusion for functional parts or long prints often comes easier at 0.6 mm than by squeezing every last optimization out of 0.4 mm. Conversely, if the goal is fine surface detail on small models, switching to a larger bore just for clog resistance sacrifices the visual quality you are after. This is a "what are you making?" decision. Thinking of diameter as a clog-prevention lever -- not just a detail setting -- helps avoid over-relying on temperature increases or excessive cleaning routines.
Preventing Recurrence
Drying and Storage Basics
The most effective prevention is not cleaning clogs after they happen -- it is keeping moisture and dust out of the printer in the first place. Filament performance depends more on storage conditions than on print settings. I store spools in sealed containers with silica gel as a default, and for moisture-sensitive materials like PETG and TPU, I feed directly from the dry box whenever possible. Since making a dry box standard for PETG, mid-print stops on long jobs have dropped noticeably.
A drying routine matters too. Rather than waiting until filament "seems bad," drying before use after any extended storage is a more stable approach. Reference targets: PLA at 40-45 degrees C for 4-6 hours, PETG at 65 degrees C for 4-6 hours, TPU at 40-50 degrees C for 4-6 hours, nylon at 70-80 degrees C for 12-24 hours. A filament dryer like the SUNLU S1 covers the 35-55 degrees C range, making it practical for PLA, TPU, and lightly-damp PETG, but insufficient for nylon's temperature requirements. Different materials need different conditions -- running them all through the same cycle gives incomplete results.
Dust prevention is less dramatic but adds up. Feeding filament straight from the spool carries whatever fine particles and shelf dust settled during storage directly into the hotend. I usually run filament through a small wiper or sponge before it enters the extruder to catch surface dust. No single pass produces a dramatic change, but clogs build from accumulated small debris, and this kind of pre-filtering makes a real difference over time.
Cleaning and Scheduled Maintenance
For prevention, the mindset shift is clearing contamination while it is still minor, rather than waiting for a full clog. The primary tool for this is the cold pull. It removes light char and embedded particles in one motion, making it practical as routine maintenance rather than just an emergency procedure. Machines running only PLA can get away with less frequent pulls, but machines with frequent color changes or running PETG at higher temperatures benefit from regular pulls to keep tip contamination from building up. Nylon works well as the pull material for its grab-and-release feel, and temperature tuning in 5-degree increments helps find the pull point consistently.
Extruder gear cleaning is equally important. A single episode of grinding dust compromises push force significantly. Even a small visible amount packed into the gear valleys reduces filament grip, and the resulting slippage and light clogging tend to cascade. I use roughly a monthly cadence for brushing out the gear teeth and surrounding area. As a prevention measure for mid-print stops and clicking, it is sometimes more effective than nozzle maintenance.
Dust around the hotend is not just cosmetic, either. Buildup on the heat sink or cooling fan reduces airflow and invites heat creep, as covered earlier. Heat creep does not require a fan to fully stall -- dust on the blades, a partially blocked intake, even that much degrades cooling over long prints. Routine maintenance should ask "is it cooling enough?" rather than just "is it spinning?"
Settings-Based Prevention
Settings-induced clogs go beyond just under-temperature. An easy one to overlook is prolonged preheating. Holding the nozzle at high temperature during extended idle time degrades resin at the tip and along the thermal boundary, producing charred deposits that seed future clogs. PLA and PETG are particularly affected by long idle times at temperature. Heating to target temperature just before printing starts keeps tip condition cleaner.
TPU demands special attention on the settings side. Its flexibility means aggressive retraction causes path deformation rather than nozzle clogging per se. On both Bowden and direct-drive machines, TPU benefits from conservative retraction distance and speed. Insufficient path constraint lets pushed TPU buckle and escape sideways, leading to gear grinding and failure. For TPU, getting retraction and path geometry right matters more than fine-tuning temperature.
When dialing in settings generally, avoid pushing extrusion parameters to their limits. Individually, higher speed, increased flow, or stronger cooling might test fine, but over a long print the accumulated margin loss shows up as instability. Short test prints that pass do not guarantee long-print reliability. For functional parts where completion matters more than peak surface quality, leaving headroom in extrusion settings produces more consistent results than running at the edge.
💡 Tip
Switching to a "heat just before printing" routine instead of leaving the nozzle hot during idle time noticeably reduces tip char buildup. This costs nothing and often beats more invasive prevention steps.
Using Nozzle Diameter as a Prevention Tool
If reducing clog frequency is the goal, nozzle diameter selection is a legitimate lever. The 0.4 mm standard works well for general use, but stepping up to 0.6 mm or 0.8 mm for practical prints measurably reduces failure rates. The larger bore tolerates minor char, debris, and slight moisture effects that would cause issues at 0.4 mm. Flow resistance drops, and the path has more margin.
Maximum layer height scales with diameter at roughly 80%, so 0.6 mm and 0.8 mm nozzles also enable thicker layers and shorter print times. This means a larger nozzle is not just more clog-resistant -- it pairs naturally with faster, thicker-layer workflows. Unless fine surface detail or thin walls are essential, choosing a larger diameter is less about sacrificing quality and more about trading precision for reliability.
In practice, functional parts I used to print at 0.4 mm with carefully tuned settings often came out with less hassle at 0.6 mm. Clog prevention usually brings nozzle cleaning and drying to mind first, but choosing a flow path that is inherently harder to block is just as valid a strategy. For long jobs or prints where finishing matters more than surface polish, the difference translates directly into easier day-to-day operation.
The core causes of extrusion failure center on Z gap set too close, extruder feed problems, light tip clogs, and cooling or moisture degradation. As a next step: heat to the material's target temperature and manually extrude a small amount. If that fails, check Z gap and leveling. If the motor turns but nothing comes out, clean the gears and check the path. Then move to a cold pull. If the problem persists, inspect the PTFE tube, nozzle, cooling fan, and assembly.
Internal link candidates (recommended for creation):
- howto-printer-setup.md (detailed printer initial setup and leveling procedures)
- filament-drying-guide.md (material-specific drying procedures and routines)
Insert at least two internal links to the above content within the body text at publication time.
Related Articles
Support Settings and Removal for FDM: How to Get Clean Results
FDM supports are a balancing act -- too many and removal becomes a nightmare, too few and your print collapses. This guide walks through the full workflow: deciding where supports are actually needed, configuring them for easy removal, taking them off safely, and cleaning up the marks they leave behind.
3D Printer Calibration | First Layer, E Steps, Flow, and Dimensional Accuracy
A 3D printer builds objects layer by layer from digital data, but on FDM machines, print quality breaks down most often when first layer height, extrusion steps, and dimensional baselines drift out of alignment rather than from flashy slicer tweaks.
3D Printer Troubleshooting: Causes and Fixes by Symptom
A practical guide for FDM/FFF 3D printer owners dealing with stringing, first-layer adhesion failure, and mid-print under-extrusion. Learn how to isolate the cause from the symptom, where to look first, and how to adjust settings step by step.
How to Fix Stringing on Your 3D Printer: Causes and Settings Guide
Prints look great with PLA, but switching to PETG or TPU brings cobweb-like strings everywhere. This guide breaks down why stringing happens — molten filament oozing during travel moves — and walks you through a step-by-step tuning order designed for home FDM/FFF users.